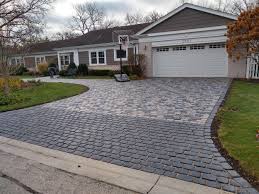
Installing driveway pavers is a great idea, and if properly installed, they will last for years without needing to be replaced and will be able to handle the weight of vehicles without cracking or getting damaged. Additionally, with the different patterns, shapes and colors that are available, you will be able to get the look you’re after.
Patience and planning are required when installing driveway pavers, and the following guide will outline the steps that are involved:
1. Make a Plan
This is a must if you want your project to succeed. You need to figure out the placement, size and design of your driveway and must ensure that you have adequate drainage so that your driveway is durable and safe. You also have to make sure your driveway slopes away from your house and must be sure that you aren’t going to strike any cables or pipes during your installation.
2. Choose Your Pavers
Brick and concrete pavers are great and come in a variety of shapes, colors and sizes. Make sure you find a style that is to your liking, and don’t forget to consider your budget so that your choice is suitable.
3. Prep the Area
This includes creating a slope that has to begin with the highest point, which is usually the bottom of the front door. You’ll have to then excavate the installation area, so you need to consider the depth of the base and must level out the soil where the paver welding will be placed.
4. Choose Your Base Material and Lay it
Coarse, crushed stone with sharp and irregular edges is often recommended because it will remain strong when compacted. Your base material must also drain properly; otherwise, your project will fail. Make sure your base is well-compacted, and install edge restraints so that your pavers remain in place over the years. You then have to put down a layer of sand, as this will hold your pavers in place.
5. Install the Pavers
Start laying the pavers along the longest straight side and do this by placing them straight down in the sand as opposed to sliding or kicking them into place. Try to keep the pavers as close together as possible and make sure they are flat and straight. You may have to cut pavers to fit the edges, so do this as needed using a masonry saw or splitter.
6. Press Pavers into Place
Once all of your pavers are installed and placed according to the pattern, you will have to use a compactor to press them into place.
7. Fill the Joints
Use coarse sand to fill the joints between the pavers and sweep it into the cracks until they are completely filled, as this will lock your pavers in place.
8. Seal Your Pavers
The right sealing product will add durability and will lower maintenance, so don’t forget about this step.